Quilted in the Hoop Makeup Pad: A Designer’s Take
Last weekend, I was putting together a custom set of reusable facial rounds for a client who runs a small organic skincare shop. Her brief was simple: make the pads feel luxurious, wash well, and look unmistakably handmade. I knew an in-the-hoop design would save finishing time and give a polished edge, so I loaded up the Quilted in the Hoop Makeup Pad embroidery file. After running a full test batch on different fabric bases, I got a clear picture of where this design excels—and where it demands a little extra thought. Here’s my honest, practical review, straight from the sewing room.
First Impressions: More than Just a Makeup Pad
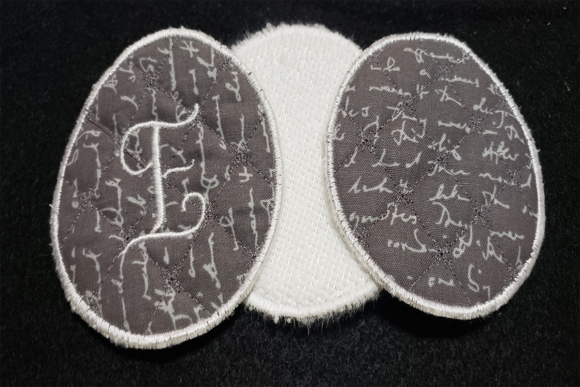
The name suggests it’s one thing, but the Quilted in the Hoop Makeup Pad is surprisingly versatile. The moment I saw the digitized file preview, I realized it wasn’t just a simple round shape with a decorative edge. The quilting element—those stitched lines that run through the center—gives it a plush, boutique feel. It immediately elevated the finished pad from “utility cloth” to “thoughtful accessory.” My mind went to nursing pads, gentle cleansing wipes, and even absorbent coasters for a kitchen towel set. The visual personality is clean and modern, with enough structure to look professional but not so fussy that it would clash with other embroidered items in a gift box.
What caught my eye is how the design stays practical for everyday personal care. The 4x4 hoop size means almost any home embroidery machine can handle it without needing to re-hoop or jog. That’s a huge selling point if you’re a craft business owner who wants to produce multiples quickly. The file creates a finished piece entirely in the hoop—no extra serging or turning required. For someone like me who values speed without sacrificing presentation, that’s a genuine win.
In-the-Hoop Construction: What to Expect During Stitching
If you’ve never run an in-the-hoop project like this, it helps to know that the Quilted in the Hoop Makeup Pad design walks you through layering fabric, stitching the quilting pattern, and then sealing the outer edge. I used a medium-weight organic cotton on the top and a soft bamboo fleece on the bottom. The machine hooped a piece of cutaway stabilizer first, then added the backing fabric, top fabric, and finally a water-soluble topper on the very top because my top fabric had a slight texture. The design sewed out with a combination of running stitches for the quilting and a dense satin stitch for the outer finishing border.
One thing I appreciated right away was the logical stitch sequencing. It didn’t jump back and forth across the hoop; the quilting lines came first, followed by the final outline in one clean pass. That kept registration tight, so the pad stayed perfectly round. Trimming away the excess fabric after the final stitch was satisfying—the satin edge held everything together without any fraying, even before a wash. If you’re selling these as a handmade product, that neat edge is what builds customer trust.
Where This Design Truly Shines
I experimented with several real-world applications to see how the Quilted in the Hoop Makeup Pad performs beyond its original purpose. Of course, it’s perfect for reusable makeup removal pads, and pairing three or five of them with a matching zippered pouch makes a darling Etsy listing. But I also produced a few slightly thicker versions using two layers of flannel and a hidden quilt batting—these turned into excellent nursing pads that held up beautifully in the wash. A fellow maker I know even stitched a dozen on organic hemp and markets them as zero-waste cleanup pads for boutique cleaning product shops.
From a brand consistency angle, the quilting offers a signature texture you can replicate across a product line. Imagine offering a baby gift set with a quilted burp cloth, a matching bib, and a set of these pads all using the same thread palette. The visual coherence screams boutique quality. Similarly, for custom apparel decorators, this design becomes a brilliant add-on gift. Sew a handful onto ribbon loops, attach a hang tag, and you’ve got a high-perceived-value freebie that turns a one-time sweatshirt sale into a memorable unboxing experience.
When to Proceed with Caution
While the design is robust, I learned a few things the hard way during my initial test stitch. First, fabric choice matters enormously. If you’re using a stretchy knit or a very thin cotton voile, the satin stitch border can pull and pucker the fabric, especially if your stabilizer isn’t matched to the stretch. I strongly recommend a no-show mesh stabilizer or a medium-weight cutaway for anything with give. On textured surfaces like a fluffy terry cloth, always use a water-soluble topper; otherwise, the loops will poke through the satin stitch and ruin the crisp outline.
Dark fabrics also deserve extra attention. The quilting stitches might not pop unless you select a contrasting thread color, and continually wiping makeup off a dark pad can make fading more obvious over time. I advise clients to keep lighter thread and fabric combinations for a cleaner, fresher look. Since this is an in-the-hoop piece, you’re essentially creating a single-layer finished item—not a patch that gets applied to something else. So those curved surfaces like caps or layered garments are not the right home for this design. Reserve it for flat, standalone items that benefit from a sewn-in finish.
Stitching Quality and Visual Appeal
After running six test pads and laundering them repeatedly, the embroidery held up without a single popped stitch. The quilted interior flattened slightly with drying, but a quick press brought the texture back. What impressed me most was the density balance. The fill stitch elements in the quilting are open enough to avoid stiffness, yet substantial enough to create a tactile pattern. That’s a delicate equilibrium many embroidery files miss. A too-dense design turns a soft cleansing pad into a scratchy coaster; this one feels gentle against the skin, which is exactly what the end use demands.
For digital product sellers, the finished item photographs beautifully. I shot flat lays on a white linen background and the subtle shadow from the quilting gave just enough depth to make the product look expensive. When I posted those photos in a maker group, the engagement confirmed my gut feeling: buyers are drawn to the promise of eco-friendly luxury, and this design delivers that visually.
Practical Embroidery Notes from My Sewing Room
If you’re considering adding this machine embroidery design to your collection—whether for personal use or as part of a craft business—here are a few non-negotiable steps I take before offering the finished pads for sale:
- Test on scrap fabric first. I ran one complete pad on a remnant to check thread tension and alignment before touching my good fabric. It saved me a headache when I realized my dark gray thread disappeared into a navy backing.
- Select thread colors with care. The quilting pattern shows up best with a subtle tonal contrast. I used a soft taupe on cream fabric for a spa-like vibe.
- Inspect the stitch density. While I didn’t alter the file, I always zoom in during the first run to ensure no overly dense areas cause needle breaks. This design ran smoothly on a 75/11 needle, but you may need a size up for thicker fabrics.
- Know your hoop limits. The design is created for a 4x4 hoop, so it fits most home machines without issue. Still, always confirm the file format your machine accepts before purchasing.
- Compare light and dark backgrounds. A pale lavender pad with white quilting looked dreamy, while the same design in black with neon accent thread felt punchy and editorial—know your market.
- Use the right stabilizer. For my final product, I went with a fusible poly mesh cutaway. It stays soft even after washing and doesn’t show through lighter fabrics.
From Hoop to Finished Product: The Customer’s Perspective
I packaged my test batch with a simple kraft band and a cotton twine tie, emulating a small shop presentation. Everyone I shared samples with commented on the “quilted” detail first—not the shape or size, but the stitching itself. That’s what sets the Quilted in the Hoop Makeup Pad apart from a plain cut circle of fleece. The embroidery gives it a perceived value that lets sellers price these sets fairly while still moving units. Whether you’re an Etsy seller listing “Reusable Spa Pads” or a maker offering a zero-waste gift collection, this embroidery design becomes a quiet workhorse in your lineup.
One creative entrepreneur I mentor used the file to create promotional patches for her natural skincare launch—attaching a single pad to the outside of gift boxes. Customers then had an immediate use for the item, and the branding felt cohesive. Because the pad is completed in the hoop, you can stitch a batch in under an hour and have them ready for same-day shipping. For busy creatives, that kind of efficiency is hard to beat.
Before you jump into a full production run, always review the commercial embroidery terms. While the design is obviously intended for physical items in the accessories category, not every seller may allow finished products to be sold without an additional license. Check whether the seller explicitly permits commercial use. Many do, but it’s a professional courtesy to confirm. The same goes for using these pads in digital mockups or printable product previews—if you plan to feature the design as part of a digital product listing, ensure the original artist’s rules align with that use.
In the end, the Quilted in the Hoop Makeup Pad exceeded my expectations as a functional, pretty, and reliable embroidery project. It doesn’t try to be overly decorative or complicated. Instead, it leans into the beauty of thoughtful construction, which is exactly what makes a handmade product feel special in a world of mass-produced sameness. I’ll be keeping this file close for future client gifts and custom accessory orders—and I suspect many other makers will do the same.